开源项目EasyFlash介绍
GaoSheng Lv4

本文简要介绍一下EasyFlash的使用及移植过程

EasyFlash三大实用功能:
1.ENV快速保存产品参数,支持 写平衡(磨损平衡)及掉电保护功能
2.库封装了IAP(In-Application Programming)功能常用的接口,支持CRC32校验,同时支持Bootloader及Application的升级。
3.Log 无需文件系统,日志可直接存储在Flash上(需配合EasyLogger)

资源占用少:

1
最低要求: ROM: 6K bytes     RAM: 0.1K bytes

EasyFlash移植难度不大,对所有 移植接口都有做预留 。移植主要是修改\easyflash\port\ef_port.c 文件,实现里面的擦、写、读及打印功能即可。

移植过程

1.将easyflash源文件及头文件添加到工程
图片1
图片2
2.根据选用的MCU的flash规格修改ef_cfg.h文件
图片3

1
2
3
4
5
6
7
8
9
10
11
12
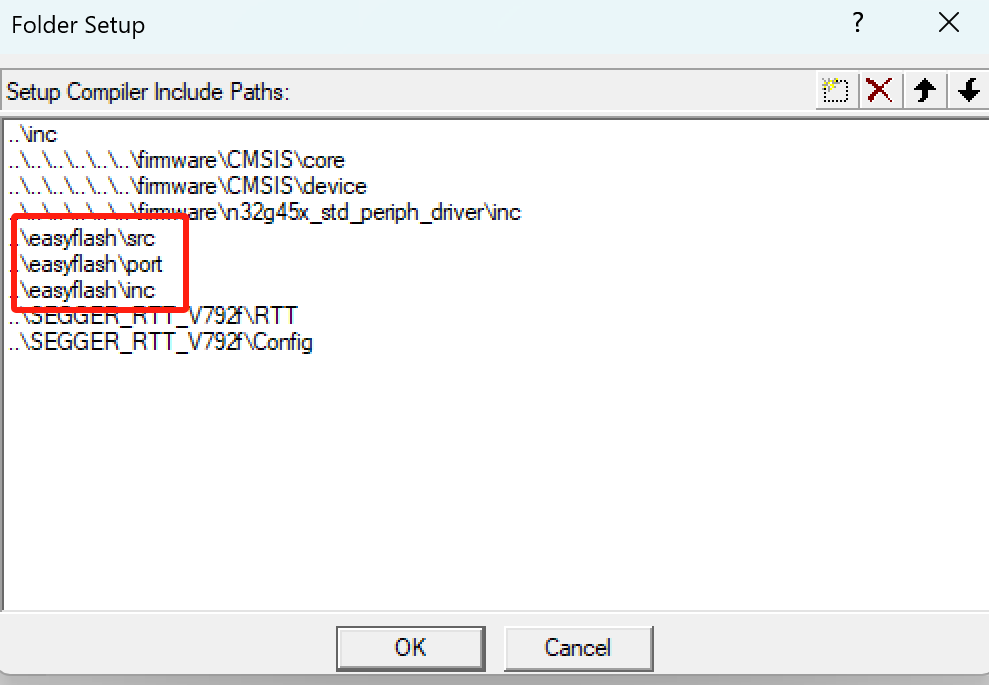
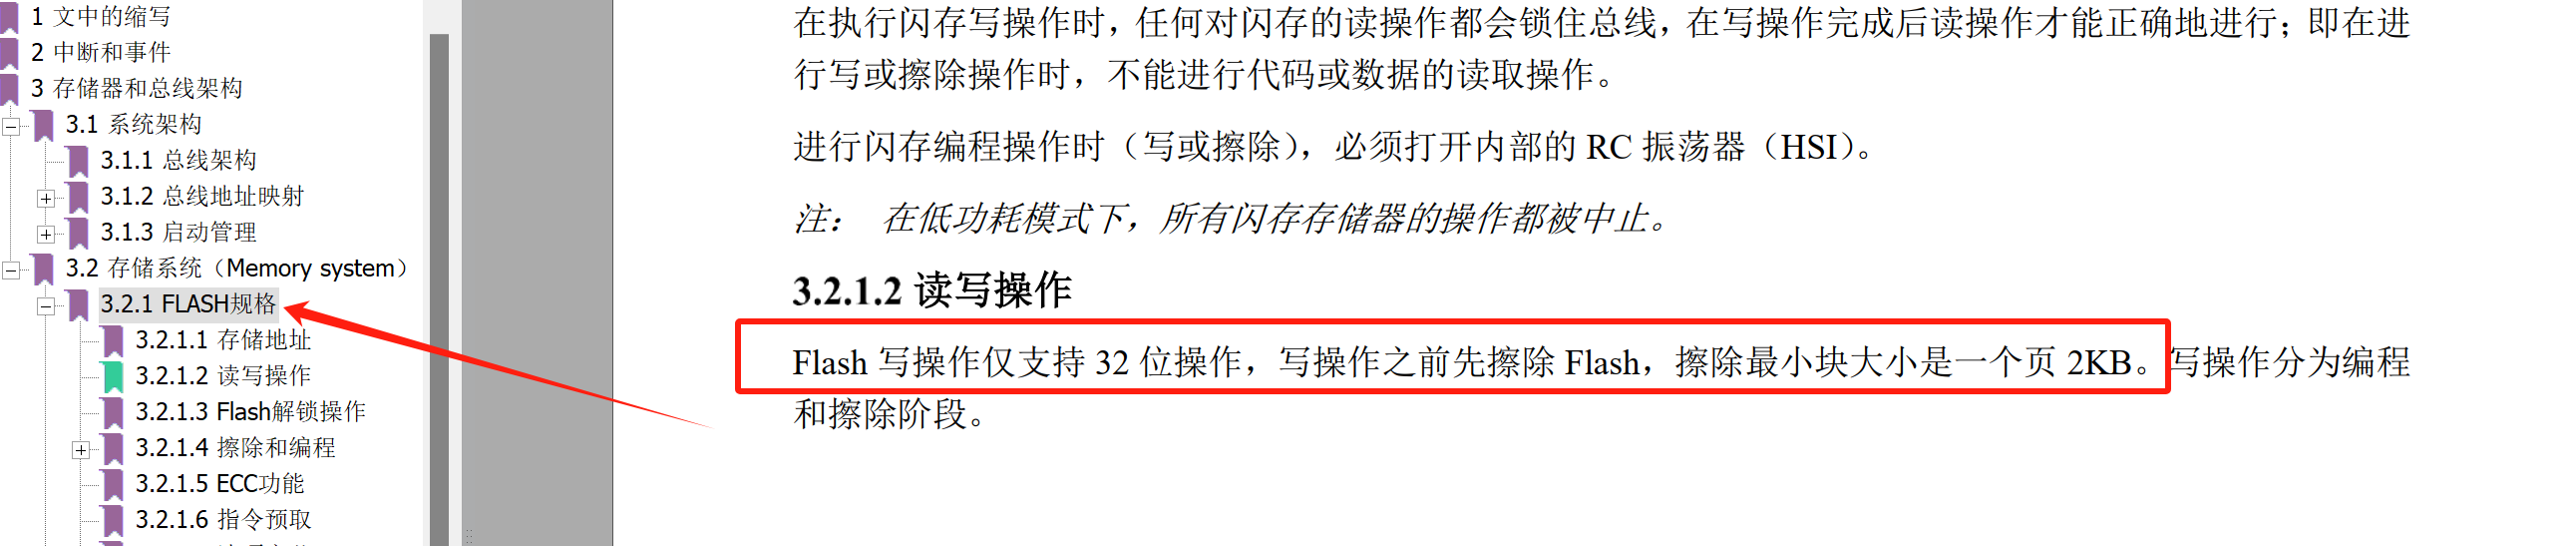
/* The minimum size of flash erasure. May be a flash sector size. */
#define EF_ERASE_MIN_SIZE 2048 /* 擦除粒度@note you must define it for a value */

/* the flash write granularity, unit: bit
* only support 1(nor flash)/ 8(stm32f4)/ 32(stm32f1) */
#define EF_WRITE_GRAN 32 /* 写入粒度@note you must define it for a value */

/* backup area start address */
#define EF_START_ADDR (FLASH_BASE + 100 * 1024) /* @note you must define it for a value */

/* ENV area size. It's at least one empty sector for GC. So it's definition must more then or equal 2 flash sector size. */
#define ENV_AREA_SIZE (2 * EF_ERASE_MIN_SIZE)/* @note you must define it for a value if you used ENV */

3.实现ef_port.c中的接口函数
这部分API的实现可以参考工程目录下的demo文件,里面提供了STM32两款不同型号的例程。
在国民G455这款MCU移植下来没什么改动,几乎都是一些宏定义上面的些许差异
例如:

1
2
FLASH_FLAG_BSY  --> FLASH_FLAG_BUSY
FLASH_FLAG_WRPRTERR --> FLASH_FLAG_WRPERR

图片4

4.测试验证
每次使用前,需先执行easyflash_init()方法对EasyFlash库及所使用的FLASH进行初始化,保证初始化没问题后,再使用各功能的API方法。
在flash中存储系统启动次数

1
2
3
4
5
6
7
8
9
10
11
12
13
14
15
16
17
static void test_env(void) {
uint32_t i_boot_times = NULL;
char *c_old_boot_times, c_new_boot_times[11] = {0};

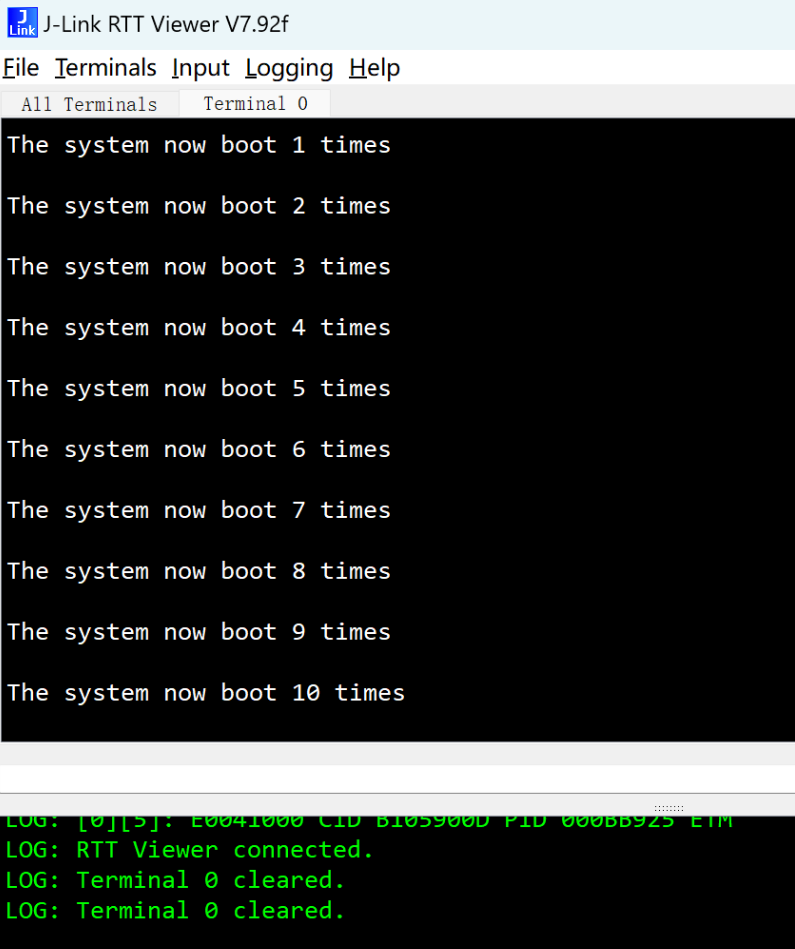
/* get the boot count number from Env */
c_old_boot_times = ef_get_env("boot_times");
assert_param(c_old_boot_times);
i_boot_times = atol(c_old_boot_times);
/* boot count +1 */
i_boot_times ++;
printf("The system now boot %d times\n\r", i_boot_times);
/* interger to string */
sprintf(c_new_boot_times,"%ld", i_boot_times);
/* set and store the boot count number to Env */
ef_set_env("boot_times", c_new_boot_times);
ef_save_env();
}

图片5

测试在一段flash空间里面写入01-FF。然后回读。注意测试写入的flash的地址不要占用之前的code空间。
写入:

1
2
3
4
5
6
7
8
9
10
11
12
13
14
15
16
17
18
19
20
21
22
23
24
25
26
27
void ef_test_write_flash(void) {
EfErrCode result;
uint8_t data[256] = {0}; // 填 0x01 到 0xFF(共255字节)
uint32_t buf32[64] = {0}; // 256字节 = 64个uint32_t

// 填充数据
for (uint16_t i = 0; i < 255; i++) {
data[i] = i + 1; // 0x01~0xFF
}

// 将 data 拷贝到 32位 buffer 中(按 4字节对齐)
memcpy(buf32, data, 255); // 多出的最后一个字节填充为0

// 必须先擦除目标区域(按页擦除)
result = ef_port_erase(FLASH_TARGET_ADDR, 1); // 1页
if (result != EF_NO_ERR) {
printf("Flash erase failed: %d\n", result);
return;
}
// 写入数据(以 32位为单位写入)
result = ef_port_write(FLASH_TARGET_ADDR, buf32, sizeof(buf32)); // 256字节
if (result == EF_NO_ERR) {
printf("Flash write success!\n");
} else {
printf("Flash write failed: %d\n", result);
}
}

回读:

1
2
3
4
5
6
7
8
uint32_t flash_data[64] = {0};
ef_port_read(FLASH_TARGET_ADDR, flash_data, 256);

uint8_t *data8 = (uint8_t *)flash_data;
for (int i = 0; i < 256; i++) {
printf("%02X ", data8[i]);
if ((i + 1) % 16 == 0) printf("\n");
}

图片6

本站由 提供部署服务